
Foam Rolling
- A J Robinson
- Aug 20, 2020
- 3 min read
Self Myofascial Release (SMR)... sounds fancy right? Well actually, its just the proper name for self-massage, whether that be using a massage gun, tennis ball, your hands, or in this case a foam roller to relieve muscle tension and knots without having to spend crazy amounts on expensive gadgets! Using a foam roller isn't hard, and can be done by anyone - not just sportspeople - so, I've put together my top tips and stretches to guide you through foam rolling, and why we should try to include it far more often within our weekly routine.
I will say at this point that although there's a great understanding of the benefits, and how to use a foam roller, there's still a fair amount of research going on within this area to compare it to other methods of SMR and recovery. Fairly obviously, I would say that a beginner to exercise would perhaps not roll their muscles as often as a pro-athlete, yet there's nothing to say we shouldn't do it. In fact, using a foam roller as part of a warm up, alongside cardio exercises and some static stretches, even a novice can follow guides on how to roll. You could alternatively use it as part of your cool down, or on rest days for muscle groups that are starting to feel a little tight - whether from exercise or repetitive daily tasks such as sitting at a desk.
Understandably, some people shy away from a roller due to the horror stories of the pain that is sometimes felt. At first, rolling over a tight muscle or knot within the muscle spindles can feel like you're rolling over a bruise, and admittedly, it's not the most pleasant feeling to start with. However, once you have gently worked through the adhesion, the body starts to relax and (believe it or not) foam rolling can feel like a godsend for recovery!
The Method:
Use the photos below as a starter guide as to where you should position yourself on the foam roller. Move gently, and when you find a point of tension hold still for up to 30 seconds - after about 15 seconds you may start to feel the muscles release, and then you'll be able to move a little more freely again over the muscle where you originally felt the tension. Spend no more than 3 minutes at a time per muscle group, and ensure that you are breathing steadily throughout. If the muscles feel more painful than just a bruised feeling, my suggestion would be to stop and try again later in the day or the following day when the pain may have eased slightly.

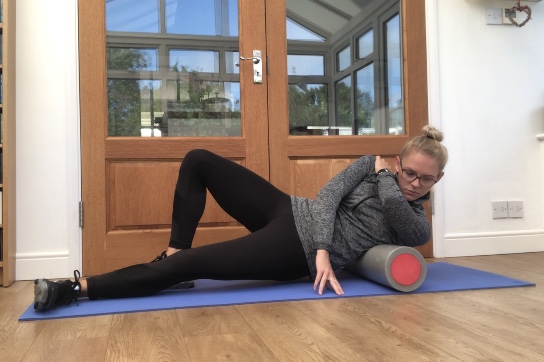

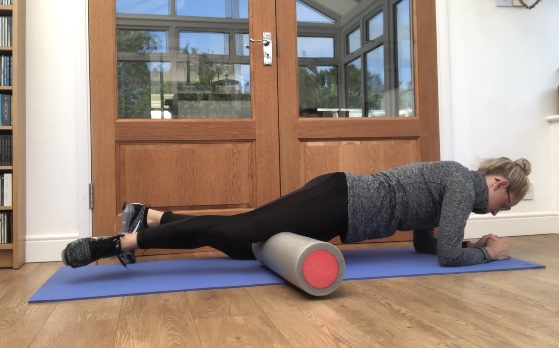

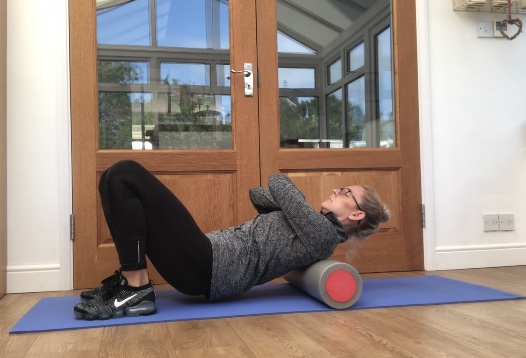

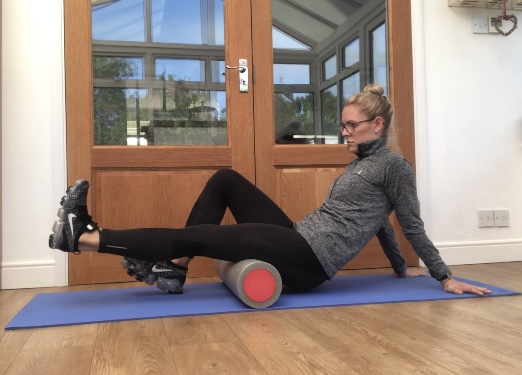

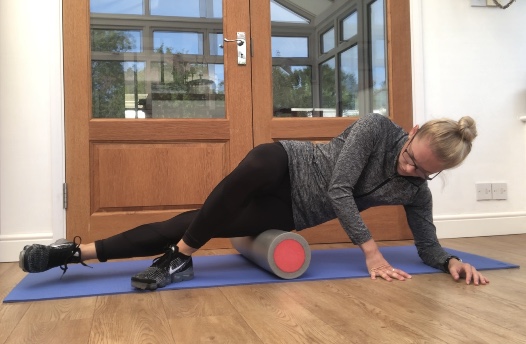


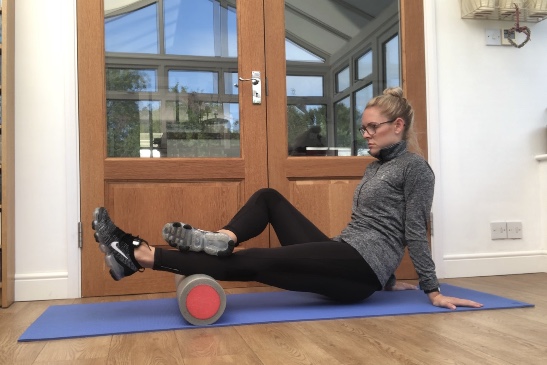
Above are several examples of muscles groups, and methods of rolling. You'll notice that when working on the lower body, my hands stay on the floor to support the majority of my weight, and vice versa for when working the upper body.
Examples include;
-Latissimus Dorsi and Erector Spinae (upper back, just under the shoulder blades/armpits)
-Adductors (inside thigh)
-Hamstring Complex (back of the thigh)
-Iliotibial Band (IT Band, sides of the thigh from the hip down to the top of the knee)
-Gluteals (muscles across the bottom and sides of the hips)
-Gastrocnemius / Soleus (calf muscles in the lower leg - avoid rolling directly behind the knee)
You can buy foam rollers from most sports stores, gyms or online nowadays, ranging from about £10 anywhere up to about £50. Some are completely smooth (see mine above), whilst others have small foam nodules or are battery powered to provide small vibrations to further roll and relax the muscular tension. In addition, rolling can help to increase blood flow to the muscle spindles before or after exercise - either to warm them up, or to help aid recovery - the more blood flows to the muscles, the more oxygen it receives and therefore the more nutrients too. Try adding this into your exercise plan once or twice a week to begin with, just working for a few minutes at a time, or alternatively you might consider rolling after a long day of work sitting at the desk... who knows, you may even start to sleep better too if you're feeling a lot less tense. It's a win win situation if you ask me!


Comments